
Riot Games’ FPS game, Valorant, is running well on most devices by now. But if you’ve clicked on this page, you’re probably experiencing some issues with the frame rate.
We have experimented with all the configurations you can change in the game and looked at the settings that professional Valorant players use to recommend you the best settings.
We cannot guarantee that this guide will fix issues like crashing, but if you follow these steps, you’ll most likely get higher FPS and remove distracting features. Let’s jump in.

First things first, you need to ensure that you meet the recommended system requirements we have listed for you below.
If you don’t meet at least the recommended system requirements, you’ll likely get some FPS issues or perhaps even crashes. We highly recommend that you upgrade your gaming PC if that is the case.
Minimum System Requirements
- OS: Windows 7/8/10 (64-bit)
- CPU: Intel i3-370M or equilavent
- RAM: 4 GB
- GPU: Intel HD 3000 (1GB VRAM) or equilavent
Recommended System Requirements
- OS: Windows 7/8/10 (64-bit)
- CPU: Intel i3-4150 or equialvent
- RAM: 4 GB
- GPU: NVIDIA GeForce GT 730 or equivalent
Hopefully, your PC meets the recommended system requirements. Valorant is not that demanding in terms of hardware, so most PCs will be able to handle it.
So, let’s start with the most obvious optimization:
Table of ContentsShow
Update Your GPU drivers
Before big game releases, NVIDIA and AMD often release driver updates that fix crashes, FPS issues, and more. We highly recommend that you check whether or not your GPU drivers are updated.
This may sound obvious, but updating your drivers is the first thing that you must do because AMD and NVIDIA usually release new drivers that can increase FPS drastically after game launches. It’s as easy as updating a piece of software on your PC.
Open up AMD Radeon Software (for AMD GPUs) or NVIDIA GeForce Experience (for NVIDIA GPUs) and check for updates. If there’s an update available, download and install it.
Here’s a screenshot of our NVIDIA GeForce Experience during an update:
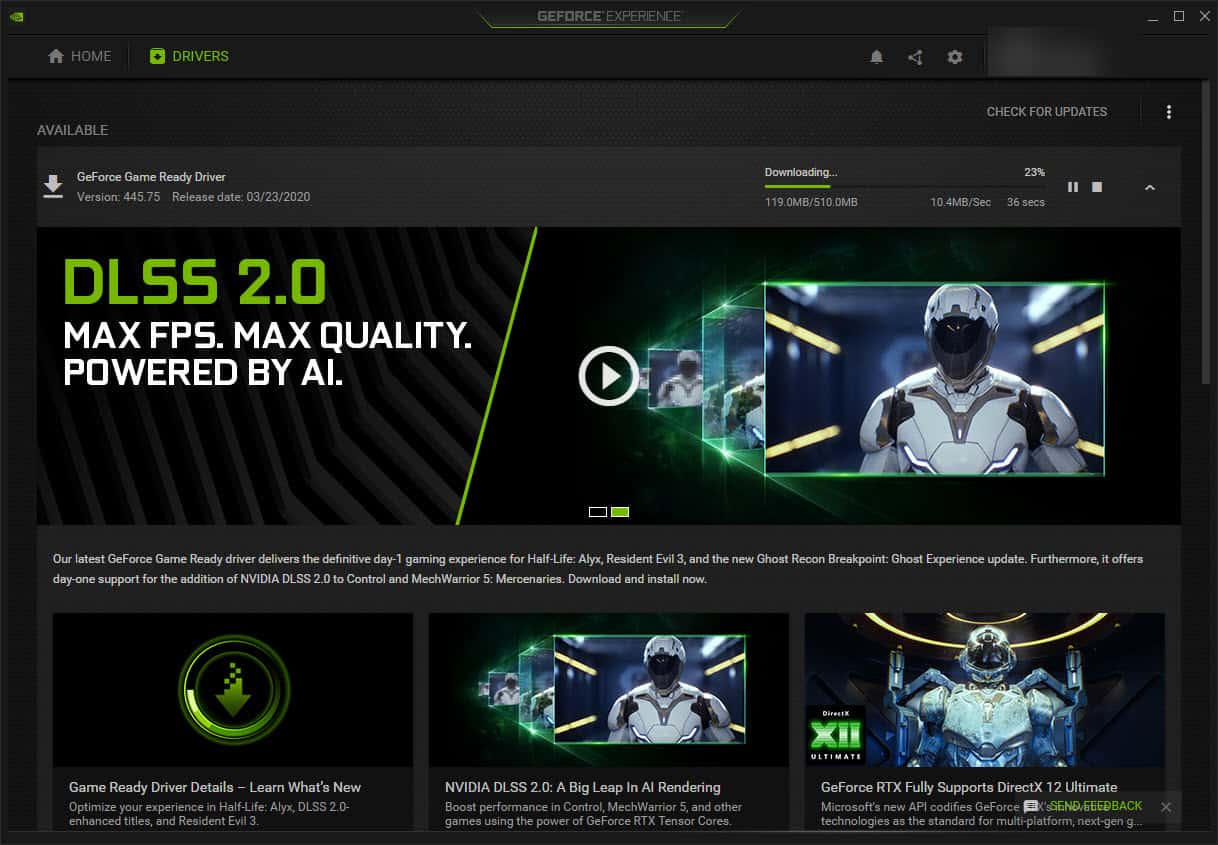
Once the download is finished, simply click on the green button that says Express Installation. When the installation is done, you’re all set.

Best Mouse Settings For Valorant
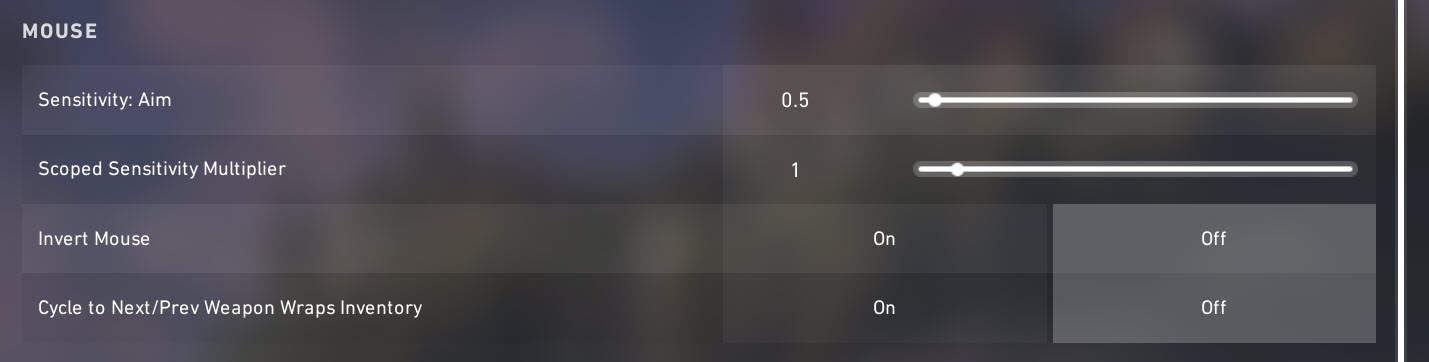
Most professionals lower their sensitivity, so we’ll take that advice and do that too. Here’s how:
- Open Valorant
- Click on Settings
- Set Sensitivity: Aim to 0.5
- Set Scoped Sensitivity Multiplier to 1
We recommend that you use a mouse with 400 or 800 DPI and that your Windows sensitivity is 6 (middle).
The average eDPI among the best VALORANT players is around 250-280 right now. Use our eDPI calculator to calculate your eDPI.
Best General Settings For Valorant
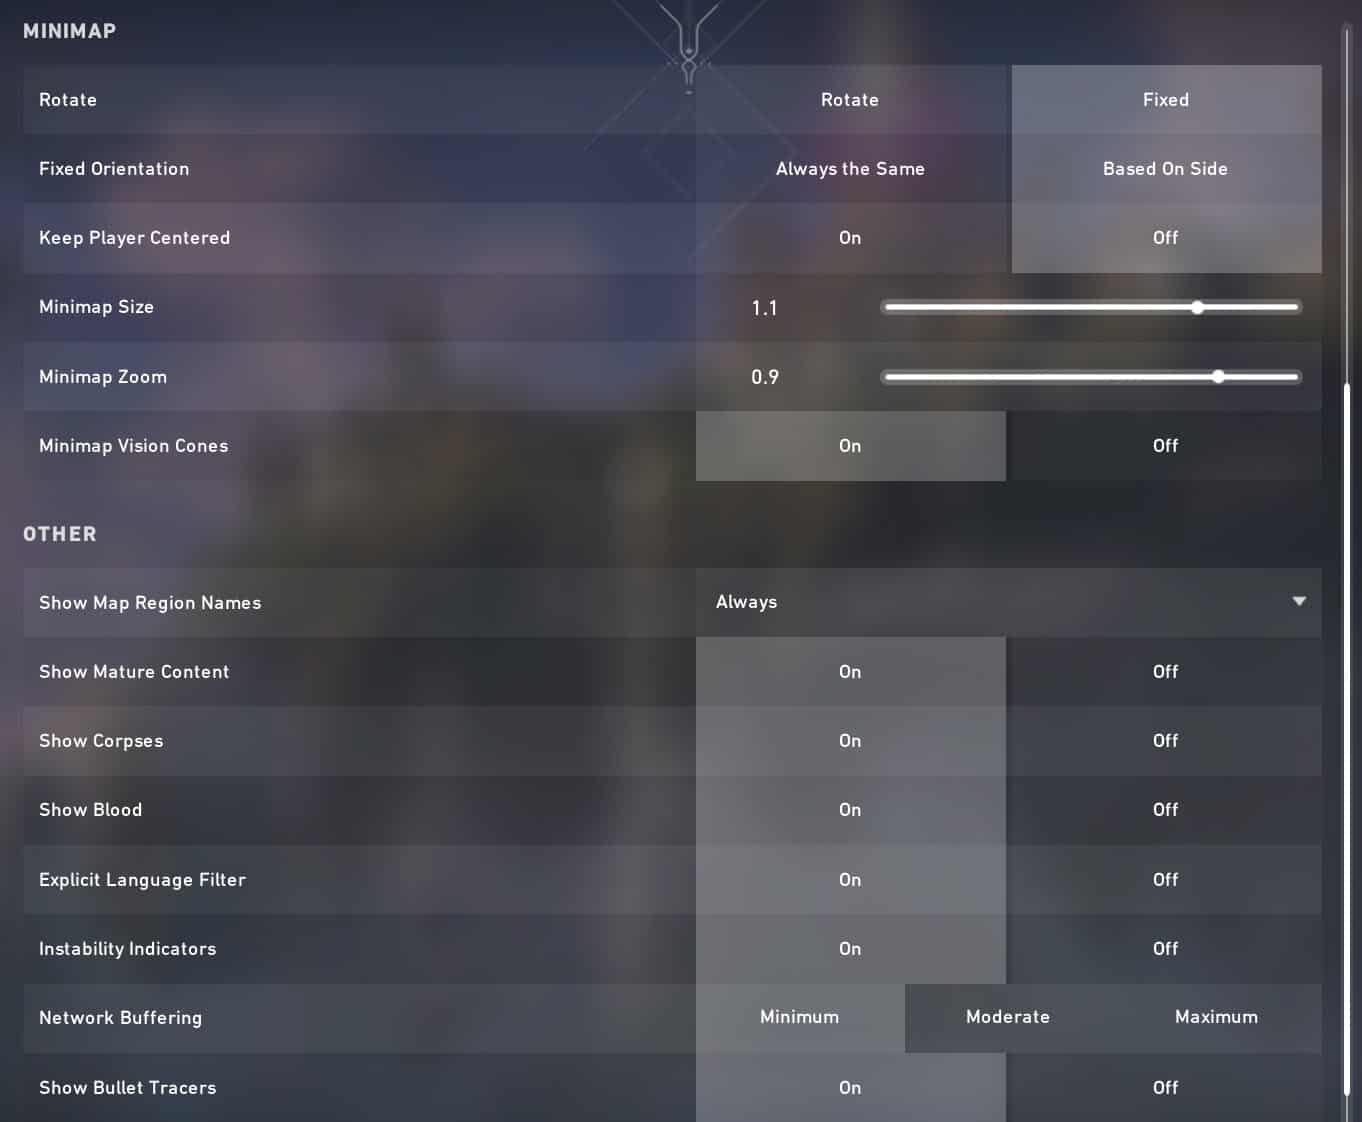
Now that we’ve optimized the mouse settings, let’s move on to the rest of the general settings. The following settings are based on professional Valorant players’ settings.
- Open up Valorant
- Click on Settings (top-left corner)
- Under Minimap, set Rotate to Fixed
- Set Keep Player Centered to Off
- Set Minimap Size to 1.1
- Set Minimap Zoom to 0.9
- Set Minimap Vision Cones to On
- Under Other, set Show Map Region Names to Always
- Set Show Corpses to On
- Set Instability Indicators to On
- Set Network Buffering to a minimum for the lowest possible input lag. Set to Moderate if your internet speed is on the slow side.
- Set Show Bullet Tracers to On
Best Crosshair For Valorant

Let’s move on to the crosshair settings now. While there is no perfect crosshair for Valorant, you’re still able to end up with a very good one after this.
- While in the settings menu, click on the Crosshair tab
- Set Crosshair Color to Green
- Set Outlines to On
- Set Outline Opacity to 0.5
- Set Outline Thickness to 1
- Set Center Dot to Off
- Set Fade Crosshair With Firing Error to On
- Under Inner Lines, set Inner Line Opacity to 1

- Set Inner Line Length to 5
- Set Inner Line Thickness to 2
- Set Inner Line Offset to 2
- Set Movement Error to On
- Set Firing Error to On
- Under Outer Lines, set Outer Line Opacity to 0

- Set Outer Line Length to 0
- Set Outer Line Thickness to 0
- Set Outer Line Offset to 0
- Set Movement Error to On
- Set Firing Error to On


Generally speaking, you don’t want a thick or large crosshair. We don’t recommend any outer lines.
Best Graphics Settings For Valorant

Let’s move on to the graphics or video settings.
- While in the settings menu, click on the Video tab
- You should now be in the General subtab. Set Resolution to your monitor’s native resolution and refresh rate. For example, if you have a 144Hz 1440p gaming monitor, then set it to 2,560 x 1,440 16:9 (144Hz)
- Set Display Mode to Fullscreen
- Set Aspect Ratio Method to Fill
- Click on the Graphics Quality subtab.

- Set Material Quality to Med
- Set Texture Quality to Med
- Set Detail Quality to Med
- Set UI Quality to Med
- Set Vignette to Off
This decreases visibility and visual clarity, so be sure to turn it off - Set VSync to Off
Enabling VSync introduces input lag and you don’t want that, so be sure to turn it off - Set Anti-Aliasing to MSAA 4x
Enabling MSAA will not cost you much performance and it will prevent blurred edges - Set Anisotropic Filtering to 2x
Anisotropic filtering affects the sharpness of surfaces at oblique angles. You won’t see much of a difference, so we recommend using a low setting here - Set Improve Clarity to On
Generally, players value clarity a lot. It makes a world of difference, so we recommend that you enable this setting. However, of course you may get a significant performance boost by turning it off, so you might want to test that and decide what speaks louder to you. - Set Bloom (Previously Enhanced Gun Skin Visuals (First Person)) to Off
A purely cosmetic feature, so we recommend that you disable this - Set Distortion to Off
This setting decreases visibility and clarity and you don’t want that, so turn it off - Set First Person Shadows (Previously Shadows) to On

We highly recommend that you get a monitor with a refresh rate of 144Hz or above. See some great options here:
Optimize NVIDIA Control Panel Settings
If you have an NVIDIA graphics card, you can optimize the NVIDIA Control Panel by following these steps:
- Open NVIDIA Control Panel
- Click on Adjust Image Settings with Preview on the left side under 3D Settings
- Click on Use my preference emphasizing: and move the slider to Performance if it’s not there already
- Click on Apply

All good! Let’s now manage some game-specific settings:
- Click on Manage 3D Settings
- Click on Program Settings
- Select Valorant in the dropdown menu
- Set Power management mode to Prefer maximum performance. You may want to split test this and the Optimal power as this setting’s effect depends on your GPU.
- Set Preferred refresh rate to Highest available
- Set Shader Cache to On
- Set Texture filtering – Quality to High performance
- Set Triple buffering to Off
- Set Vertical sync to Off
- Set Virtual Reality pre-rendered frames to 1
If you have a laptop, make sure to choose High-performance NVIDIA processor as the preferred graphics processor.
Optimize AMD Radeon Settings
If you have an AMD graphics card, follow these steps to optimize your AMD Radeon settings.
- Open up AMD Radeon Settings
- Click on the Gaming tab
- Click on Global Settings
- Set Anti-aliasing Mode to Override application settings
- Set Anti-aliasing Level to 2X
- Set Anisotropic Filtering Mode to On
- Set Anisotropic Filtering Level to 2X
- Set Texture Filtering Quality to Performance
- Set Wait for Vertical Refresh to Always Off
- Set Tessellation Mode to Override application settings
- Set Maximum Tessellation Level to 32x or lower
Disable Windows Update Delivery Optimization
Moving on, there’s a simple trick you can do to free up some resources:
- Open the Windows Start Menu, enter Windows Update settings and click on the search result for it
- Click on Advanced Options
- Click on Delivery Optimization
- Make sure that the Allow downloads from other PCs setting is off
Disable OneDrive
We also recommend that you disable OneDrive if you’re not using it. Right-click on the OneDrive icon on your taskbar and click on Exit.
Optimize Discord
If you’re playing Valorant, then you’re most likely using Discord to communicate with your friends or team (if you’re not playing solo).
It’s quite easy to optimize Discord. Here’s how:
- Open up Discord and go to the User Settings page

- Click on the Appearance tab and uncheck the Hardware Acceleration setting

- Click on the Overlay tab
- Make sure that Enable in-game overlay is unchecked


Optimizing Google Chrome
If you’re using Google Chrome, you can turn off hardware acceleration as well – we strongly recommend doing this. Here’s how:
- Open Google Chrome and go to the Settings page
- Scroll down to the end and click on the Advanced tab
- Scroll down to the end and make sure that the setting Use hardware acceleration when available is switched off
- Make sure that the setting Continue running background apps when Google Chrome is closed is switched off
- Relaunch Google Chrome
High-Performance Power Plan
You can boost the performance by enabling the high-performance power plan on your PC. Just follow these simple steps:
- Open the Windows start menu
- Type powercfg.cpl and press Enter
- Select the High performance option

Enable Game Mode
Windows 10 has a setting called Game Mode that we recommend you turn on. Here’s how you do it:
- Open the Windows start menu
- Type Game mode settings and press Enter
- Make sure that the Game Mode option is turned on.
For a long time, people recommend turning Game Mode off. That was correct for a while, but Game Mode is actually good now and we recommend that you turn it on.
SSD
It should go without saying that SSDs are vastly superior to HDDs when it comes to speed and gaming. We recommend that you install Valorant on an SSD for the best loading times and gaming experience.
If your PC does not have any SSDs, you can get an external SSD.
Final Thoughts
We gathered professionals’ recommended settings in this optimization guide to offer you a better experience and a more stable FPS than before when playing Valorant.
Hopefully, your problems with frame rate are over and you’ll now enjoy playing Valorant much more!


